Graphical UI for image restore

A new version of the image restore has a graphical UI now. See the release.This was prompted by a couple of reasons:

  • The network/wifi configuration utility wicd-curses not being available in Debian bullseye anymore (because they removed Python 2.x)
  • Using network-manager to configure networking should be easier as well
  • It includes gparted so one can adjust partitioning after restore
  • Obviously the UI is more comfortable and can display more at once. For example it can display speed, amount restored and restore size instead of just displaying a progress bar.

Hurdles:

  • Didn’t find a lightweight keyboard layout selection tool. So I had to add my own as restore step which was a bit complicated. This is might be more comfortable this way, however.
  • Firefox doesn’t have an “app mode” so it has to use chromium

Todo/Known issues:

  • Restore speed needs to be multiplied by 8, I guess
  • Maybe style can be made a bit better + logos?
  • Currently it only restores the main volume, and doesn’t restore SYSVOL + ESP. This needs to be added
  • A manual partition restore mode where the partition to restore to can be selected would be good
  • Using the USB drive or a selectable disk as spill space to support restoring to disks that are too small. (Restore to disk extented by spill space, then ntfsresize onto the smaller disk space, then remove spill space)

Feedback? Any ideas of extra debian packages that should be included? Submit at pull request to the branch or comment in the forums.

Linux image backups with UrBackup 2.5.y

So I’ve resisted the idea of Linux image backups for a while. After all, one can just backup all the files, right? True, even with Linuxs fast file access this might take a bit longer than doing an image backup if one has a a lot of files and one wants to back them all up…

Image backups also make backups and restores a lot easier. One doesn’t have to think about what to backup, instead it’s just the whole thing. When restoring, it’s just one step: Copy back the volume.

Advantages:

  • Everything is backed up
  • Content does not affect backup or restore performance (e.g. many small files don’t slow down backups and restores)
  • 1:1 backups and restores of volumes

Disadvantages:

  • Can’t select subset to backup (e.g. exclude temporary file data)
  • Can’t migrate to different file system on restore
  • File level deduplication doesn’t work
  • E.g. defragmentation causes changes to backup

The following are step-by-step instructions on how to backup a Linux VPS.

Backup VPS (Step-by-step)

Assumption: VPS is running Debian 10/buster. 2.5.x server + client is used.

1. Add new client on server web interface:

2. Add active/Internet client

3. Copy & paste Linux client installation command and follow setup:

4. Reboot client/VPS (if not using dattobd)

5. Create image backup (“C” gets automatically translated to the Linux root volume)

Restore VPS (Step-by-step)

1. Browse to image backup in “Backups” tab on web interface

2. Click on restore Linux image

3. Copy & paste into new Debian 10/buster instance and follow instructions:

Ransomware canary

One upcoming feature is the ransomware canary file. The idea is that UrBackup generates a random file that looks like a file that potential ransomware should definitely encrypt. The backup server then checks if this file was changed or deleted during every backup. If ransomware encrypts the file the backup server will notice, fail backups and the backup server admin will get notified via alerts, can easily see the last known good backup and those good backup won’t get replaced by bad backups (backups with ransomware encrypted files).

The setting to configure this is only present on the server. For example it would be set to

Users/*/Documents/^important (don’t delete)/important

Clients would go into the „Users“ backup path, descend into all „Documents“ directories below any folder directly below „Users“. Create a „important (don’t delete)“ folder if it doesn’t exist yet (that’s what the caret does). Then create a (random) „important-[SERVER TOKEN].docx“ canary file in that folder. The owner of the folder and file is set intelligently to the owner of sibling files or parent folders.

For now it is a very basic implementation. I.e.,

  • It only uses a „docx“ file
  • The template „docx“ is bundled with the client and only minimally modified on each client
  • Only works with file backups

If a user moves, deletes or modifies a canary file the remedy to get backups working again would be to set the canary paths to empty for one file backup.

Thoughts? Improvement ideas?

Automatic notarization for macOS

During the effort of building the UrBackup client for macOS the problem of automatically notarizing the build came up. There is only sparse documentation and disparate sources for that. The current build script does this in pure bash now. You can see this and use it as reference here:

https://github.com/uroni/urbackup_backend/blob/1b5d55439aad2a799ca5b55137feb0b72198d0c3/create_osx_installer.sh#L124

Raspberry PI 4 Backup Appliance update

An update for the Raspberry PI 4 backup appliance (last post). Raspberry PI specific changes:

  • Upgrade Linux kernel to 5.4.y. This allows e.g. a swap file on the system disk
  • Removed the USB 3.0 UAS driver, since it doesn’t seem to work (with the disks I tested it with — see also this thread). This makes USB disks slower, but at least it works reliably
  • Use xchacha12+adiantum as system disk encryption method since RPI4 doesn’t have AES CPU instructions. This significantly increases performance

    If you want to use it manually outside the appliance use
    cryptsetup luksFormat --cipher xchacha12,aes-adiantum-plain64 --type luks2 --sector-size 4096
    to format the encrypted disk

Download the image for the SD card.

Write the image to the SD card using e.g. Win32 Disk Imager.

Discussion

Discuss the Infscape UrBackup Appliance here.

Building completely static Linux binaries via Android NDK

The Android NDK can be used to build completely static Linux binaries which run on any Linux.

Advantages:

  • Runs on every Linux distribution be it RHEL, Debian or Alpine
  • Linux (i.e. Linus Torvalds) is pretty strict about backwards compatibility so it’ll continue to run on future Linux kernels without problems
  • Theoretically it’ll even work without a Linux distribution, e.g. in a minimal Docker container
  • All the dependencies are static and confirmed to work together

Disadvantages:

  • Might use more memory at runtime since libraries (such as libc.so) aren’t shared with other programs
  • Behavior might deviate from other programs in the distribution. E.g. when it doesn’t respect /etc/nsswitch.conf, parses /etc/resolv.conf differently or when OpenSSL looks for the root certificates in the wrong place

To mitigate the disadvantages the UrBackup client Linux binary installer first tries to use a glibc (non-static) build on amd64/x86_64 (the most common platform). Only if that doesn’t run (e.g. because the glibc is too old), does it fall back to the NDK build.

Previously this was done with ELLCC, but that doesn’t support C++ exceptions and doesn’t seem to get updated anymore.

Usage

Since UrBackup uses autotools to build, cross compilation is automatically present and can be used simply by setting a few environment variables before building:

export NDK=/path/to/android/ndk/android-ndk-r20
export HOST_TAG=linux-x86_64
export TOOLCHAIN=$NDK/toolchains/llvm/prebuilt/$HOST_TAG
export TARGET=x86_64-linux-android
export TARGET2=${TARGET}29
export AR=$TOOLCHAIN/bin/$TARGET-ar
export AS=$TOOLCHAIN/bin/$TARGET-as              
export CC=$TOOLCHAIN/bin/$TARGET2-clang                
export CXX=$TOOLCHAIN/bin/$TARGET2-clang++                
export LD=$TOOLCHAIN/bin/$TARGET-ld                
export RANLIB=$TOOLCHAIN/bin/$TARGET-ranlib                
export STRIP=$TOOLCHAIN/bin/$TARGET-strip
export NDK_CPUFLAGS=""
 ./configure --enable-headless --enable-c-ares --enable-embedded-cryptopp --enable-embedded-zstd LDFLAGS="-static -Wl,--gc-sections -O2 $NDK_CPUFLAGS -flto" --host $TARGET --with-zlib=$TOOLCHAIN/sysroot/usr --with-crypto-prefix=$TOOLCHAIN/sysroot/usr --with-openssl=$TOOLCHAIN/sysroot/usr CPPFLAGS="-DURB_THREAD_STACKSIZE64=8388608 -DURB_THREAD_STACKSIZE32=1048576 -DURB_WITH_CLIENTUPDATE -ffunction-sections -fdata-sections -ggdb -O2 -flto $ARCH_CPPFLAGS" CFLAGS="-ggdb -O2 -flto $NDK_CPUFLAGS" CXXFLAGS="-ggdb -O2 -flto $NDK_CPUFLAGS -I$NDK/sources/android/cpufeatures/ -DOPENSSL_SEARCH_CA" LIBS="-ldl" 

See also the script that builds the Linux client installer.

The advantage UrBackup has here, is that many dependencies are already bundled with the source code like crypto++, zstd, lua and sqlite. All the dependencies that are not bundled need to be compiled to a static library (for every architecture) and in my case I have put them into $TOOLCHAIN/sysroot/usr/.

Complications

The Android NDK is of course made to build programs for Android. There are significant differences between Android and other Linux distributions. Here is two I found:

If one wants to resolve a DNS name such as example.com to an IP address one usually uses getaddrinfo(). This won’t work with the Android NDK libc (bionic libc), because it uses the Android resolver by calling some Android runtime java code that is obviously not present on non-Android systems. The solution for this problem was to use c-ares instead of the libc to resolve addresses. If you are using a library that resolves addresses that needs to have the option of using c-ares as well (such as cURL).

A call to system() or popen(), calls the shell (usually /bin/sh). The Android libc, however, calls /system/bin/sh instead, which is of course not present on non-Android distributions. The solution was to replace all those calls to an own version. Again, if any library one uses does use those, they’ll need to be replaced.

On x86 and amd64/x86_64 the Android NDK automatically uses SSE4 CPU instructions which older CPUs do not support. Users complained about that and that client should run on as many systems as possible.
To disable SSE4 the Android NDK compiler needs to be passed “-mno-sse4a -mno-sse4.1 -mno-sse4.2 -mno-popcnt” (that was the only way I found). The problem is that some SSE4 instructions are in the libc and libc++. So, the libc and libc++ need to be recompiled with those flags. The bionic libc source code is (unfortunately) NOT part of the Android NDK source code, it is part of the Android source code.
So after downloading 50GB of Android source code for half a day, one needs to change the Go source code of Androids custom build tool (soong). Adjust e.g. build/soong/cc/config/x86_64_device.go, select the correct architecture to build, then fish out the libc.a (and libc++.a) from the output directory and replace the more then dozens of libc.a occurrences in the NDK (no idea which one it actually uses).

One final complication was that crypto++ does actually feature test and then use SSE4 instructions, so they need to be enabled for some crypto++ compile units. If one specifies both “-mno-sse4” and “-msse4”, “-mno-sse4” seems to take precedence. So the solution was to have a compiler wrapper script that removes “-mno-sse4” in such a case.

Raspberry Pi 4 backup appliance

Rapsberry PI 4 is (finally) relatively powerful hardware and suited to host a UrBackup appliance. Specifically:

  • 4 GB RAM
  • 64 bit support
  • USB 3
  • Gigabit ethernet
  • Build-in Wifi

The RAM is of course not ECC-RAM which makes it unsuited for large UrBackup appliance instances or serious use (you could always risk it, see notes on ECC RAM section on the bottom).

The main advantages of Raspberry Pis are that they are widely available, have good support and merely by having so many people focused on them, having few bugs.

A few gotchas when setting up a UrBackup server:

  • Use the SD card as a read-only device for booting the operating system. Regularly writing to the SD card will break it because SD cards are not designed for such use. There are “industrial” SD cards designed for regular (random) writes (e.g. SwissBit) but they cost way too much (an external USB SSD is cheaper)
  • I had a lot of problems getting the 64bit Linux kernel to boot, but I guess this will improve
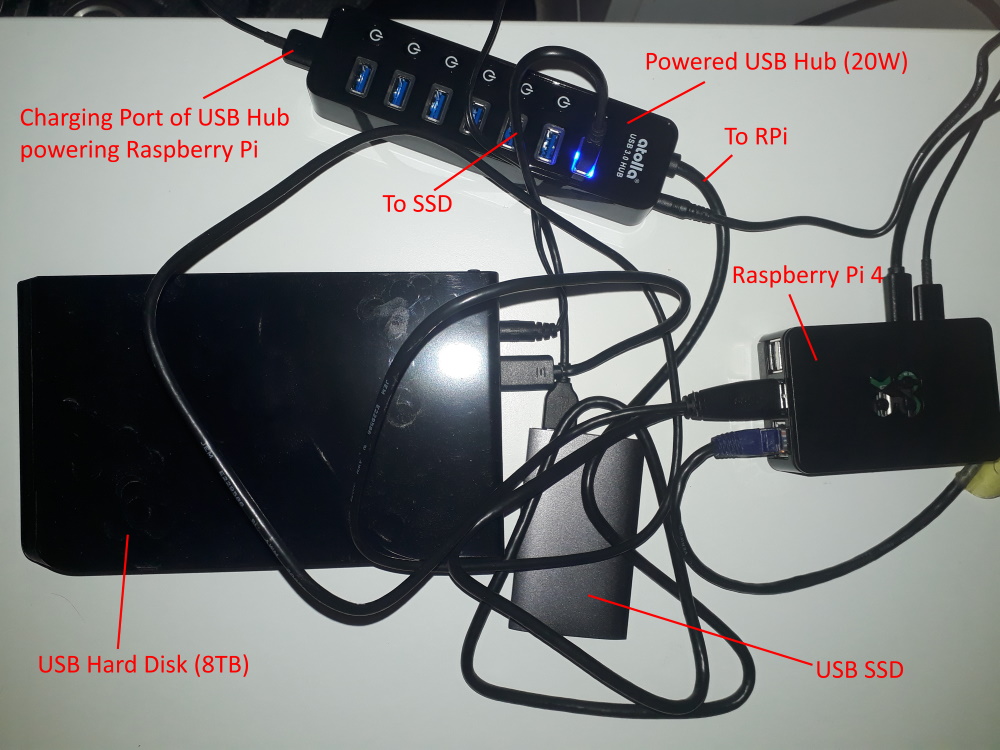
  • Power supply is still an issue. The USB SSD drive I was using caused issues because (I think) the power supplied by the Raspberry wasn’t enough. I’d guess the Raspberry + USB SDD need a 4A power supply at least.

The system plus costs (w.o. taxes):

Raspberry PI 4 Model B 4GB50 €
Intenso SSD 256GB37 €
32GB microSD SDHC3 €
Raspberry Pi 4 Case6 €
Powered USB 3 hub 5V/4A (20W)20 €
USB 3 to USB C cable7 €
Sum (w.o. taxes)123 €

Once you have the base system, you can add USB disks as backup storage, use those 2-bay docking stations + disks or use larger 4-bay USB external disk enclosures. Adding single USB disks is probably cheapest.
Alternatively, if using the Infscape UrBackup Appliance, you can store your backups directly to the cloud (Amazon S3 or compatible) using the SSD as local cache.

Software

I’ll describe how to setup the Infscape UrBackup Appliance. You can of course also install Raspbian and install UrBackup on that.

Download the image for the SD card.

Write the image to the SD card using e.g. Win32 Disk Imager.

For setup, you’ll have to attach the Raspberry PI to your wired ethernet network. After setup, you can run it via Wifi only. Put the SD card into the Raspberry and start it up. After boot it’ll show its IP address on its display. Alternatively, you can look for new devices on your router, or using an IP range scanning tool.

Browse to http://YOURRASPBERRYIP and follow the setup wizard.

Make sure the SSD is attached and click on “+Use device” on the status screen. Then use the SSD as external system disk (UrBackup database, logs and temporary files will be stored on the SSD instead of the SD card).

If you want to store the backups to S3, select that you want to use the system disk as cache (or attach an additional SSD as cache only disk). If you want to store the backups to a local (USB) disks I’d recommend to also use the system disk as cache for the local USB disks (cached, auto-layout RAID).

ECC-RAM

If you are unlucky a single bit error in your Raspberry PI RAM can make the whole backup storage unwritable. In that case you’ll have to either make a new backup server and replicate everything (that is still readable) to that one, or simply start with a new backup server. The worst case is that it corrupts data in such a way that it does not detect the corruption, in which case you’ll only find there is a problem when you restore/actually want to use the backup.
That said, the probability of the RAM having problems is perhaps very low. We can probably trust the Raspberry PI foundation to have selected reliable RAM plus settings that minimize the risk of corruption.
The cloud/RAID backup storage has an advanced option “Size of in-memory write-back cache”. Per default it is disabled and you probably shouldn’t use it if you don’t have ECC-RAM as it increases the time data is kept in memory before it is written to checksum protected storage.

Discussion

Discuss the Infscape UrBackup Appliance here.

How to handle “Data error (cyclic redundancy check)” (system error code 23)

If you get an error like this during image backups:

Error on client occurred: Error while reading from shadow copy device (1). Data error (cyclic redundancy check).

Or like this during a file backup:

Error getting file patch for “x/y/z.file” from CLIENT. Errorcode: ERRORCODES (11)
Remote Error: Reading from file failed. System error code: 23

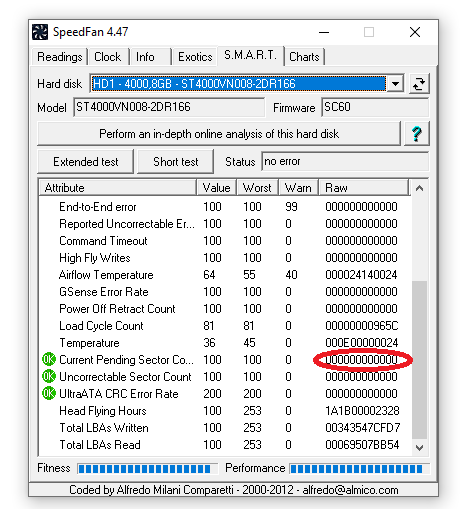
Or you get the same error while copying/accessing a file in any program (Windows Explorer, etc.) you have damaged sectors on your hard disk. One way to confirm this is to have a look at your disk’s S.M.A.R.T. values (e.g. with SpeedFan; please comment with a better alternative if you have any).

The raw value of “Current pending sector count” should be greater than zero.

As an explanation: Your hard disk is designed such that the probability that each sector becomes unreadable is really low. Nevertheless, it is still possible and expected during a hard disk’s lifetime, as such the hard disk is engineered to handle this failure case. The hard disk has a few spare sectors. If a sector becomes damaged, the hard disk replaces this sector with one of those spare sectors. The good case is that the hard disk detects that a sector has problems while still being able to read the data in this sector (e.g. by retrying or using storage redundancy). In this case it can read the data, replace the sector with a spare one, write the data to the spare sector and use the spare sector from then on (S.M.A.R.T. value “Reallocated Sector Count” is increased by one).
If it cannot read the data it has to return a error saying that it cannot read the sector (and increase “Current Pending Sector Count” by one). The next time the sector is written to, it’ll write the data to a spare sector, then replace the damaged sector with the spare one (and decrease “Current Pending Sector Count” by one while increasing “Reallocated Sector Count” by one).
The error being returned by Windows if the hard disk says a sector is unreadable is “Data error (cyclic redundancy check)” (system error code 23).


If you don’t have a copy of the damaged sector you have lost data. You could retry a few times. Put the hard disk in a freezer and then retry or something, but chances are it won’t work.

This doesn’t mean your hard disk is completely broken. It may be an indication that it is going to break completely soon, but you also might have just been unlucky during normal operation.

How to fix it

If the error message includes a file path, replace the file with a backup copy. If you don’t have a backup copy, you can either delete the whole file, or use the scrub tool below to only delete the damaged parts of the file (if it is a movie file or an image it might be mostly okay).

If it is occurring during image backups, the scrub tool has the option to find out which files are damaged. You can then either replace the files with backup copies, delete the files or let the scrub tool delete the damaged parts of the file.

If the damaged files are Windows system files, they might get fixed by running a system integrity check. Open an admin console (WINDOWS + X then “Windows PowerShell (Administrator)”) then enter “sfc /scannow”.

Scrub tool

The UrBackup client (starting with 2.4.x) includes a tool that scans a whole disk, then lists the damaged files, then has the option to delete damaged parts of a file.

  • Download and install UrBackup client from https://www.urbackup.org/download.html#client_windows
  • Go to “C:\Program Files\UrBackup” in Explorer
  • Right-click “scrub_disk.bat” then select “Run as Administrator”
  • Select the volume you want to repair
  • If it finds unreadable sectors it asks if you want to list the damaged files (this might take some time) and if you want to delete those unreadable sectors

Btrfs file system stability status update

I wrote before in a blog entry about btrfs stability. That was almost exactly seven years ago.The issue I had back then (about a hard link limit of hard links in the same directory) was fixed a long time ago.

Since then btrfs has come a long way. The most significant development was that SUSE started using btrfs as root file system and put several developers to work on finding and fixing bugs. Simultaneously only few new features were added. This significantly improved stability (at least for the root file system use case).

As just hinted, the main problem is that each developer just looks after their set of use cases. So, developers from Facebook mainly look at their use case of using btrfs on their HDFS storage nodes. They have redundancy etc. on a higher level, so they are probably using btrfs only with single disks and focusing on making btrfs performant and stable within this use case. SuSE, as said, uses it as root file system (system files), where there are single disks or, at most, mirrored disks. File system repair isn’t too important, as those file systems don’t get very large and contain non-unique data.

Compared to that when using UrBackup with btrfs:

  • Storage is for backup and/or long term archival (RAID6 etc. would be appropriate)
  • Can have a lot of threads writing data to the file system at once
  • Can have combination of threads writing lots of small files and large files (image backups)
  • Lots of snapshots (backups) of different sub-volumes, some of which can persist for a long time
  • Deduplication (at least file level)
  • Can’t reboot the server, when it gets stuck like you’d be able to with e.g. a HDFS node
  • UrBackup imposes a database style workload (db for deduplication), where latency is important as well as the backup workload, where throughput is important
  • File system can get very large and it is very time consuming to move data from a damaged (read-only mounted) file system to a new one

This, combined, was guaranteed to cause problems when seriously using btrfs as UrBackup storage. The most persistent issue was premature ENOSPC, where btrfs has an error saying it is out of space, remounting the file system read-only, even though there is still a lot of free space (both for data and metadata) available on the disk(s). The problem seems to be solved (on the systems I observe) with Linux 5.1 or Linux 4.19.x with this patch. RAID56 is still officially “unstable”.

Btrfs isn’t alone with having issues with this work load. When using UrBackup seriously (large number of clients with many simultaneous backups) e.g. with ZFS, I experienced a lot of different issues with ZFSOnLinux (especially in connection with memory/thread management), making ZFSOnLinux unusable. ZFS on FreeBSD was a little better, but there also were issues that occurred about once per week causing hangs.

Btrfs also isn’t the sole area where Linux was needing improvement in the storage area. For example, writeback throttling was significantly improved a few years ago. This example improves the memory management, making Linux more able to handle the mixed database and archival workload mentioned above. Not to say that all errors are fixed. For example, I recently learned that a call to synchronize the file system to make sure that data is actually written to disk does not return errors on Linux. There is now a work-around for that, at least for btrfs, in UrBackup but there hasn’t been a fix on the Linux side in general, yet.

Another important consideration is performance. One thing w.r.t. btrfs to keep in mind is that there is a feature, or better trade-off, where there is a back-reference from each disk data location to each file/item using that disk data location. So, you can ask btrfs to list all files having data at e.g. disk offset 726935388160 and it will do so fast compared to other file systems like EXT, ZFS, NTFS, etc. which would have to scan through all files. Managing the backref metadata comes with the cost of having more metadata in general, though. Operations such as writing new data to files, deleting files, deleting snapshots, etc. become a bit slower as the backref metadata has to be added or deleted, in addition to the (forward) metadata pointing from file to data. Btrfs goes to great lengths making this fast, though (delayed backrefs etc.). There is a number of unique features of btrfs which could be implemented because of the presence of back-references:

  • File system shrinking
  • Device removal
  • Balancing
  • If there is a corruption, it can show all the files (and offsets into files) affected
  • Quotas
  • Btrfs send

The performance problem with backrefs is that if a file has a lot of reflinks or snapshots, it may have a lot of backrefs. Running one of the operations above then involves a lot of iteration through all backrefs, making this operation (unusably) slow. UrBackup naturally creates a lot of snapshots and may reflink certain files many times. The work-around (at least for me) is to avoid the above operations at all cost and patch out the reflink walking in btrfs send.

Conclusion

Should you use btrfs with UrBackup? It is certainly the file system with which UrBackup works the best. Outside of that you’d have to see if you can have:

  • Linux kernel at least 4.19.x (I suggest using the latest LTS kernel). If you have ENOSPC issues with 4.19.x apply patch.
  • Able to avoid above operations such as file system shrinking or device removal
  • Able to avoid btrfs RAID56 (i.e. use RAID1(0) instead or use btrfs in single mode on top of a storage layer that provides integrity such as Ceph or the UrBackup Appliance)
  • I’d suggest using ECC memory, as btrfs repair once it is damaged is mostly not possible

Connect clients with a HTTPS CONNECT web proxy

With 2.4.x you can use UrBackup with a HTTPS proxy. This way you can have the web interface and the clients connecting at the same port, secured by the same transport encryption (SSL). This post shows how to do this in combination with the Apache web server.

The idea is that the client connects to the web server and issues a HTTP CONNECT request to the actual UrBackup server.

First Enable CONNECT proxy module in apache. On debian via

a2enmod proxy_connect  

Then allow connections to the UrBackup server Internet port by adding

AllowConnect 55415

to your apache configuration.

Next in your apache virtual host configuration, set proxy options such as the timeout, allow proxy connections to the UrBackup server, and disallow them to every other host:

ProxyTimeout 600
ProxyRequests On  
<Proxy 127.0.0.1:55415>
</Proxy>
<ProxyMatch ^(?!127.0.0.1:55415$).*$>
    Order Deny,Allow
    Deny from all
</ProxyMatch>

Then, go to your UrBackup server web interface and setup your web server URL as Internet client proxy (https://example.com) and the Internet server name/IP as 127.0.0.1. Internet clients should then start connecting via your web server to your UrBackup server. Once all clients connect this way you could turn off UrBackup’s build in Internet transfer encryption and rely on SSL.

Fixing client IP addresses

You may notice that on the status page all Internet clients now show the IP address of your web server as their IP address. Fixing this is a bit difficult, as there is no standard way to forward the client IP address information from the web server (compared to a normal HTTP proxy where there is a X-Forwarded-For header). So, a bit of hacking to fix this is in order. I modified the mod_proxy_connect apache plugin to forward the client IP information in a 50 byte buffer to the backend: mod_proxy_connect.c
On debian you could replace your original mod_proxy_connect with the modified one via the following commands:

apt install apache2-dev
wget https://gist.githubusercontent.com/uroni/143c0d7ed6169e89f2d6c59a870dd4cc/raw/28dd30b1f82938777c504f2afdc5f162fd91b3fd/mod_proxy_connect.c
apxs -i -a -c mod_proxy_connect.c

Then in the UrBackup server advanced global settings set “List of server IPs (proxys) from which to expect endpoint information (forwarded for) when connecting to Internet service (needs server restart)” to include your web server IP (127.0.0.1 in the example here). After a server restart you should be able to see the actual client IP instead of the web server IP on the status screen.

Fixing SNI errors

If you have multiple virtual hosts with SSL there is an issue with SNI. Apache2 automatically compares the hostname in the CONNECT request with the server name in the SSL connection (SNI) and rejects the request if they differ. The only solution (or ugly hack) I found to fix this was to add the hostname with the target IP to /etc/hosts and then use the hostname instead of the IP in the CONNECT request. I.e., add “127.0.0.1 example.com” to /etc/hosts, then replace 127.0.0.1 with example.com in all the configuration above.

Additional proxy authentication

As additional security layer, one can require proxy authentication. Clients need to know a username+password to get through the web server to the UrBackup server. With apache2 e.g.:

 htpasswd -c -b /etc/apache2/urbackup_password urbackup passw0rd 

Then modify the proxy section to:

<Proxy 127.0.0.1:55415>
    AuthType Basic
    AuthName "Restricted UrBackup"
    AuthBasicProvider file
    AuthUserFile "/etc/apache2/urbackup_password"
    Require user urbackup
</Proxy>

Afterward add username+password to the proxy url, that is e.g. https://urbackup:password@example.com